How to Begin a Drawing - Hallo friends
IDEAL BODY SECRETS, In the article you read this time with the title How to Begin a Drawing, We have prepared this article for you to read and retrieve information therein. Hopefully the contents of postings
Article Fit Career,
Article Fit Family,
Article Fit Food,
Article Fit Home,
Article Fit Life,
Article Fit Mind,
Article FREE online workouts,
Article Recipes,
Article Workout Reviews, We write this you can understand. Alright, good read.
Title :
How to Begin a Drawinglink :
How to Begin a Drawing
Read too
How to Begin a Drawing
NOTE: If you get my blog posts by email, I'll need to set up a new mechanism, because Google is taking away email subscriptions next month. I'll send you a special email sometime next month to let you know where to subscribe if you want to continue receiving a daily feed.
Which of the following is the best way to start a drawing?
A. Simple straight lines. B. Sketchy lines leaving the exact contour unclear, and C. Short, indefinite strokes.
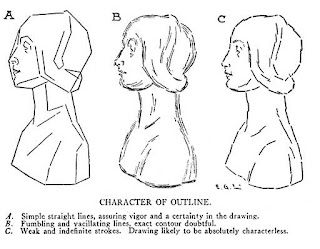
In his 1916 book
Practical Drawing, E.G. Lutz suggested that students should follow the first method. The other two lead to "vacillating" and "characterless" results.
He suggests you look for the longest and most prominent lines first and sketch them in lightly, but to keep them simple and straight, rather than drawing curving lines.
It's easier to measure the other lines and slopes after you have the big, straight lines worked out. You can hold up a plumb line to judge the vertical lines or just use a pencil, which is also useful for measuring slopes.
You can also trace the line invisibly in the air with your finger before you actually draw it on the paper. Lutz says "It may look odd to a spectator to see you make mysterious gestures in space, but what of it? The practice serves its purpose of giving you a better notion of the subject and making pictorial rendering easier."
After you're sure the big lines are right, you can begin placing the secondary and tertiary lines. Draw them lightly and be willing to erase and correct them early in the process. It's hard to fix mistakes later.
Once the drawing is accurately established, the next task is to begin shading. Lutz discusses the following methods:
—"An even tone put on first, nearly that of the half-tint. Try to work this way; in in continuing, keep the shadings in simple, unbroken tones.
—Shading reduced to an aggregation of flat areas of flat areas of tints from the darkest to the lightest. A good way to work if not overdone or carried too far.
—Trying to get the exact effect of roundness with the first strokes of the pencil or charcoal. This way of starting will result in uncertain and vague forms, looking less like the subject than a drawing made in flat tints. Not a good way to start."
In my experience, whether you're painting or drawing, you have to organize values. That means classifying the tones in your mind. Group together the parallel planes and simplify them into a finite and recognizable group of tones. This gives more force and clarity to your drawing or painting.
I have copies of Practical Drawing plus Drawing Made Easy in my web store, and would be happy to sign them for you or a young artist you're encouraging.
NOTE: If you get my blog posts by email, I'll need to set up a new mechanism, because Google is taking away email subscriptions next month. I'll send you a special email sometime next month to let you know where to subscribe if you want to continue receiving a daily feed.

Thus Article How to Begin a Drawing
That's an article How to Begin a Drawing This time, hopefully can give benefits to all of you. well, see you in posting other articles.
You are now reading the article How to Begin a Drawing with the link address https://idealbodys.blogspot.com/2021/07/how-to-begin-drawing.html


0 Response to "How to Begin a Drawing"
Post a Comment